Introduction
Not every project goes the way you plan, especially when you're trying a construction you haven't done before. This knife started as a sword I was making for a friend to give as a knighting gift. It was inspired by the weapons from Birka grave Bj 581, and we chose a hilt in Petersen's Type V style. For the blade, I wanted to try a wrought-iron core with high-carbon steel edges.
The sword never made it past the fish-mouth weld at the point. For this weld, I made two 45-degree cuts into the end of the billet, leaving an opening shaped a bit like a fish's mouth. The two sides are brought together and forge-welded shut so the high-carbon steel runs along both cutting edges and wraps around the point, enclosing the wrought-iron core at the tip. I tried several times to close the weld, but the material was too thin and I kept losing length each time I cut the failed end away. I eventually turned what was left into a Scandinavian long knife instead of throwing it in the scrap pile.
I wanted to document both parts of the project: why we chose this sword, what went wrong at the forge, and how I ended up with a knife. The finished piece has its own build record in the Works section, so here I want to focus more on the decisions and lessons behind it.
1. Historical Inspiration: Birka Grave Bj 581
A friend asked me to make the sword for his squire. His plan was to give it to her when she became a knight in the Society for Creative Anachronism (SCA). I liked the idea of making something with a historical connection to a woman buried with weapons, and I also knew the build would push me beyond what I had done before. We settled on a sword inspired by Birka grave Bj 581.
Birka, on the island of Björkö in Sweden, was an important Viking Age trading town. Grave Bj 581 is well known because of the weapons and other objects buried with the individual. These included a sword, axe, fighting knife, two spears, two shields, arrows, two horses, and gaming equipment. For a long time, the grave was understood as the burial of a high-status male warrior.
The weapons played a big part in that early assumption. Later study of the bones and DNA, however, showed that the buried individual was biologically female (Hedenstierna-Jonson et al. 2017; Price et al. 2019). Scholars still disagree about what her exact role was and how we should read the burial as a whole. What we do know is that a woman was buried with this collection of weapons, and that made the grave a meaningful starting point for a sword meant to celebrate a woman's knighthood.
1.1. Petersen Types V and E: The Attribution Problem
We knew before starting that there were questions about which sword belonged to Bj 581 and how it should be classified. Jan Petersen published his Viking Age sword typology in 1919. His types are based mainly on the shapes and construction of sword hilts rather than the blade itself. The system is still used today, but not every surviving sword fits neatly into one type.
Petersen Type V swords have a two-part pommel with a rounded, three-lobed upper section. Some have decorated guards and pommels with geometric patterns worked in other metals (Petersen 1919; Viskupič 2025). Type E swords are another group of decorated hilts, often discussed in connection with hollow fittings, pitted or pierced decoration, and wirework. The differences matter here because swords from two Birka graves have been identified and labelled differently over time.
In his 2014 book on Viking Age Swedish swords, Fedir Androshchuk listed a Type V sword with Bj 581 and a Type E sword with Bj 524. Later work questioned those assignments. Tomáš Vlasatý and, more recently, Michal Viskupič argued that the broken Type V sword belongs to Bj 524, not Bj 581. So part of the argument is about which grave each surviving sword actually came from, not just what style of hilt it has.
Linda Wåhlander and swordmaker Peter Johnsson examined the sword linked to Bj 581 in Buried at Birka (2023, pp. 118–121). Their section is called "The Type E Sword," but the discussion is more complicated than the title suggests. They compare the early grave drawings with the surviving sword and describe X-rays showing a hollow pommel cap fastened with a U-shaped bar, which they read as evidence of a Type L construction. Museum records add another point of confusion: the Swedish History Museum lists the sword identified with Bj 581, inventory 263195_HST, as Type W, while a separate Type E sword, inventory 263051_HST, has an uncertain grave assignment. I don't think it would be fair to present any of these labels as beyond question without explaining the disagreement.
We knew about the Type V and Type E debate when we planned the sword. In the end, we chose a Type V hilt simply because we liked the way it looked. I wasn't trying to prove that a Type V sword was buried in Bj 581 or to make an exact copy of everything in the grave. The burial was our inspiration, and the hilt style was a choice we made for the finished piece.
2. How I Planned to Build the Sword
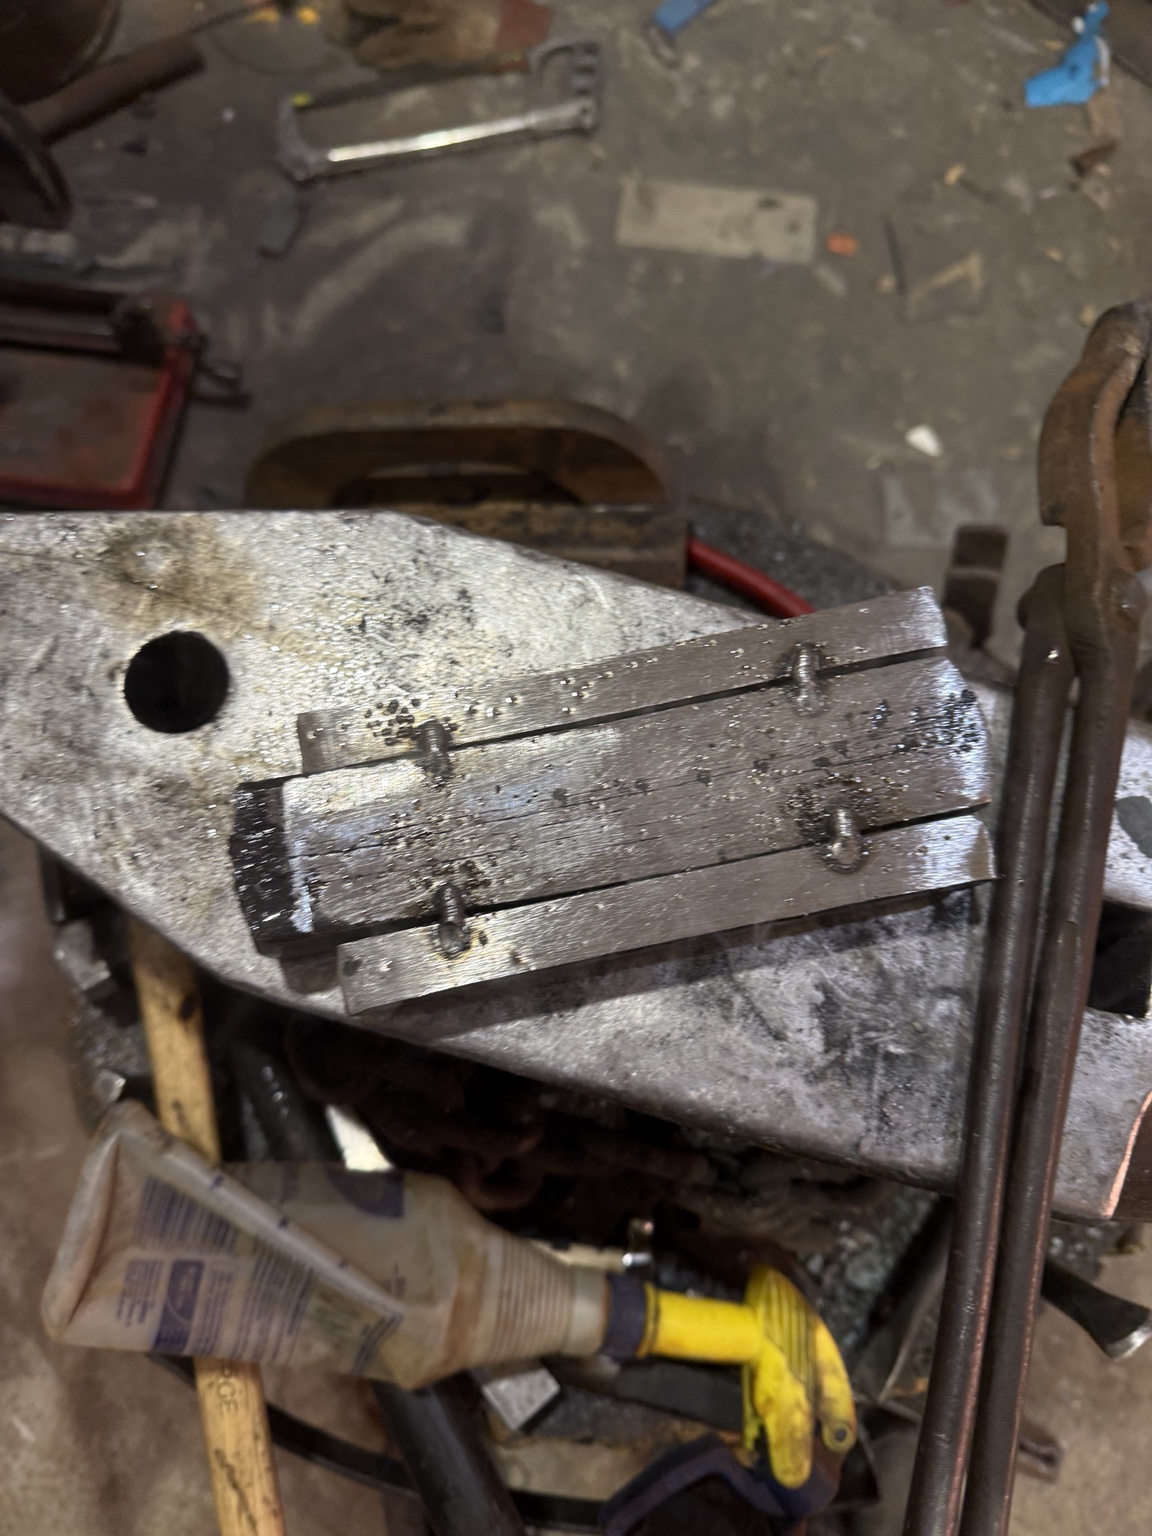
The blade was meant to have three bars running its length. A bar of wrought iron would form the center, with a bar of modern 1084 high-carbon steel on either side. The 1084 would become the two cutting edges, while the wrought iron would remain in the middle of the blade.
Early medieval smiths used several kinds of composite blade construction, but I don't want to suggest this exact arrangement has been proven for the Bj 581 sword. This was my own attempt to work with historical materials and methods. I had made a high-layer-count random pattern-welded sword before, but I'd never made a sword-length billet with this kind of wrought-iron core. I'd also only completed one successful fish-mouth weld. I wasn't very confident going in, but I wanted to see if I could do it.
2.1. The Difficulties of Wrought Iron
Wrought iron can be frustrating to work with. It often has slag running through it in long lines, and those lines can open or tear if you work it too cold. In my forge, the wrought iron also seems to move faster under the hammer than the higher-carbon steel beside it. That makes it harder to keep the bars even as you draw the billet out.
I had to keep the iron from tearing while also keeping the welds straight along the blade. That meant working hot, watching how the different materials moved, and not taking too much with any one hammer blow. The welds were holding, but as I worked toward sword length, I ran into a problem I should have planned for earlier: I was running out of thickness at the tip.
3. Not Enough Starting Material
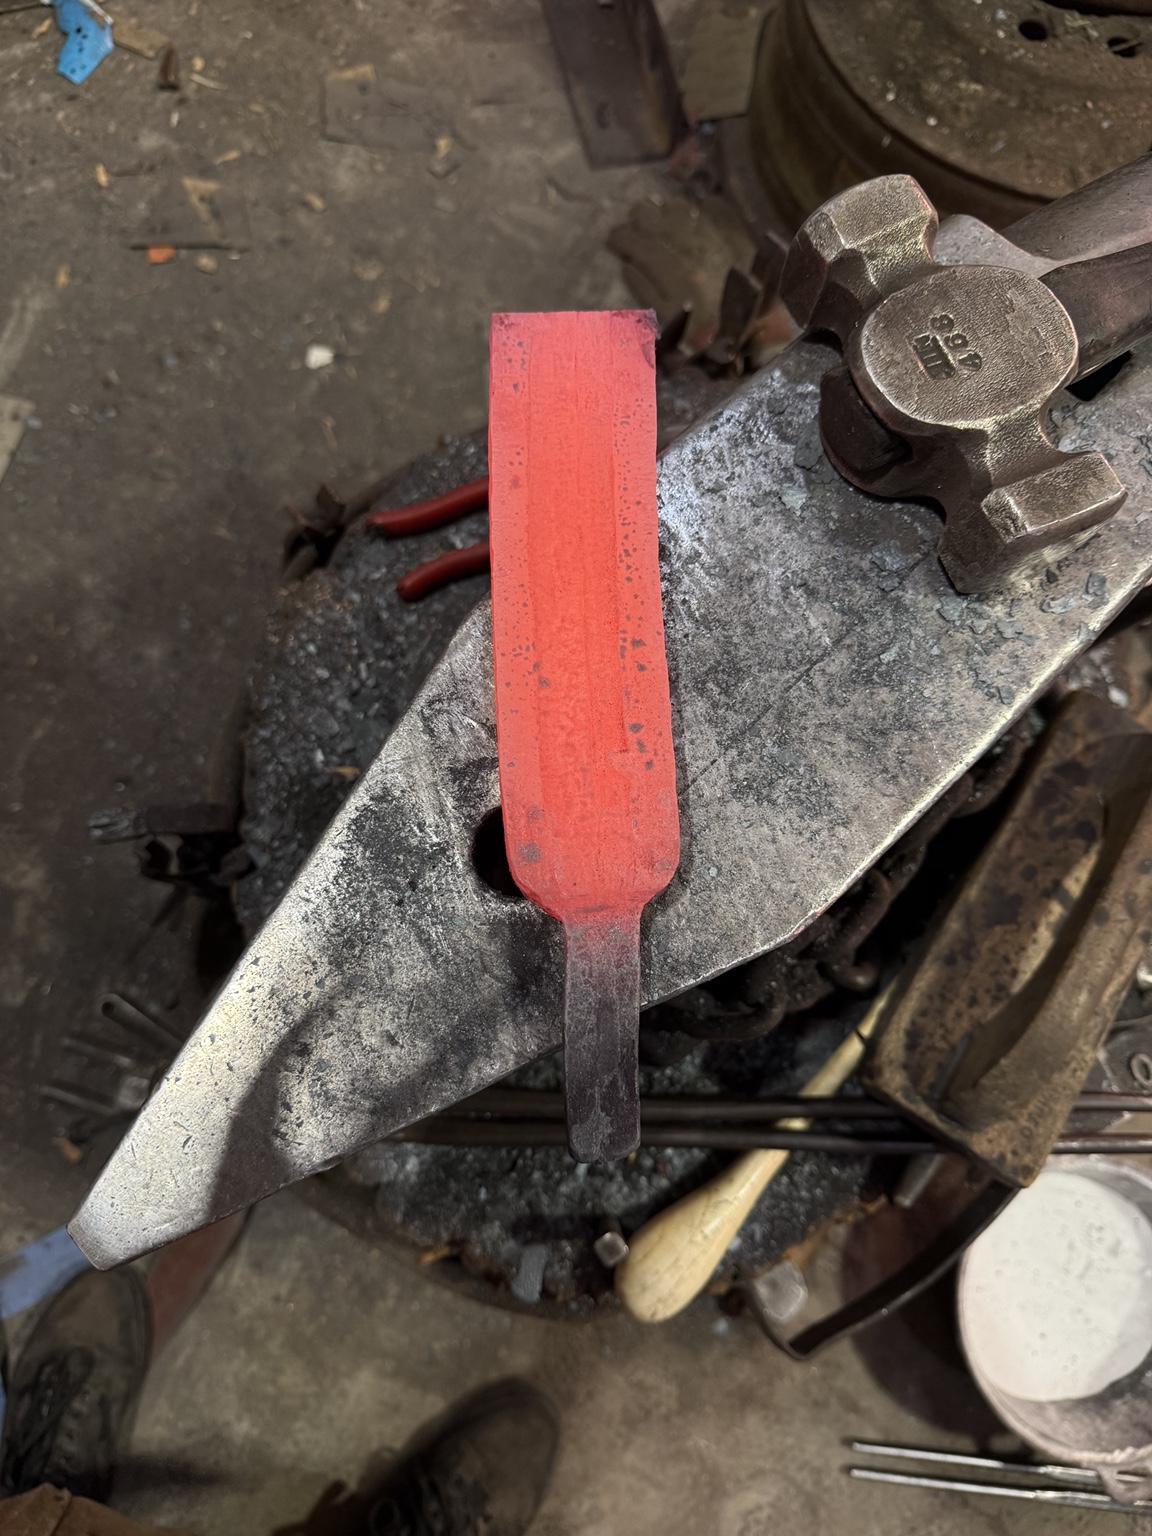
My biggest mistake was starting with too little material. As best I can remember, the original billet weighed about 1.5 pounds (0.68 kg). I thought that would give me enough steel and iron for the sword. By the time I had drawn the blade out anywhere near the length I wanted, though, the tip was less than 3 mm thick.
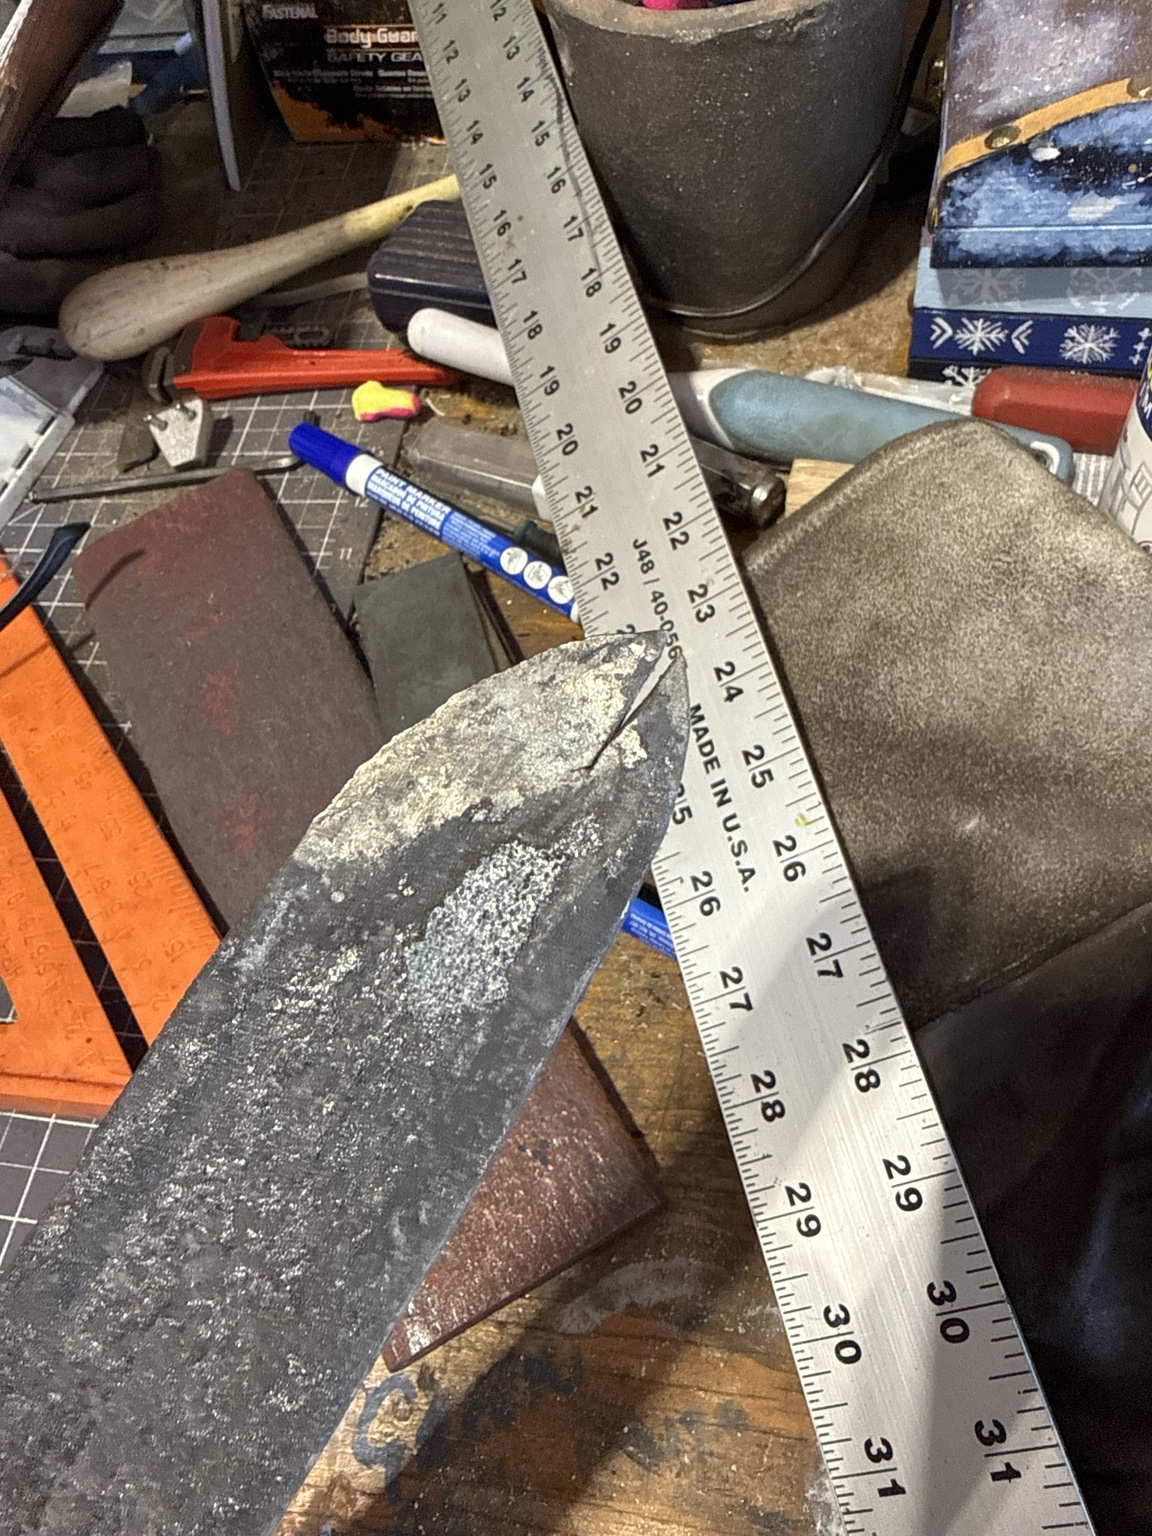
That might be fine for a finished part of some sword blades, but I still needed to close the fish-mouth weld at the point. At that thickness I could get the tip hot, but I couldn't keep enough heat in it long enough to control the joint and get a good weld.
3.1. The Failed Fish-Mouth Weld
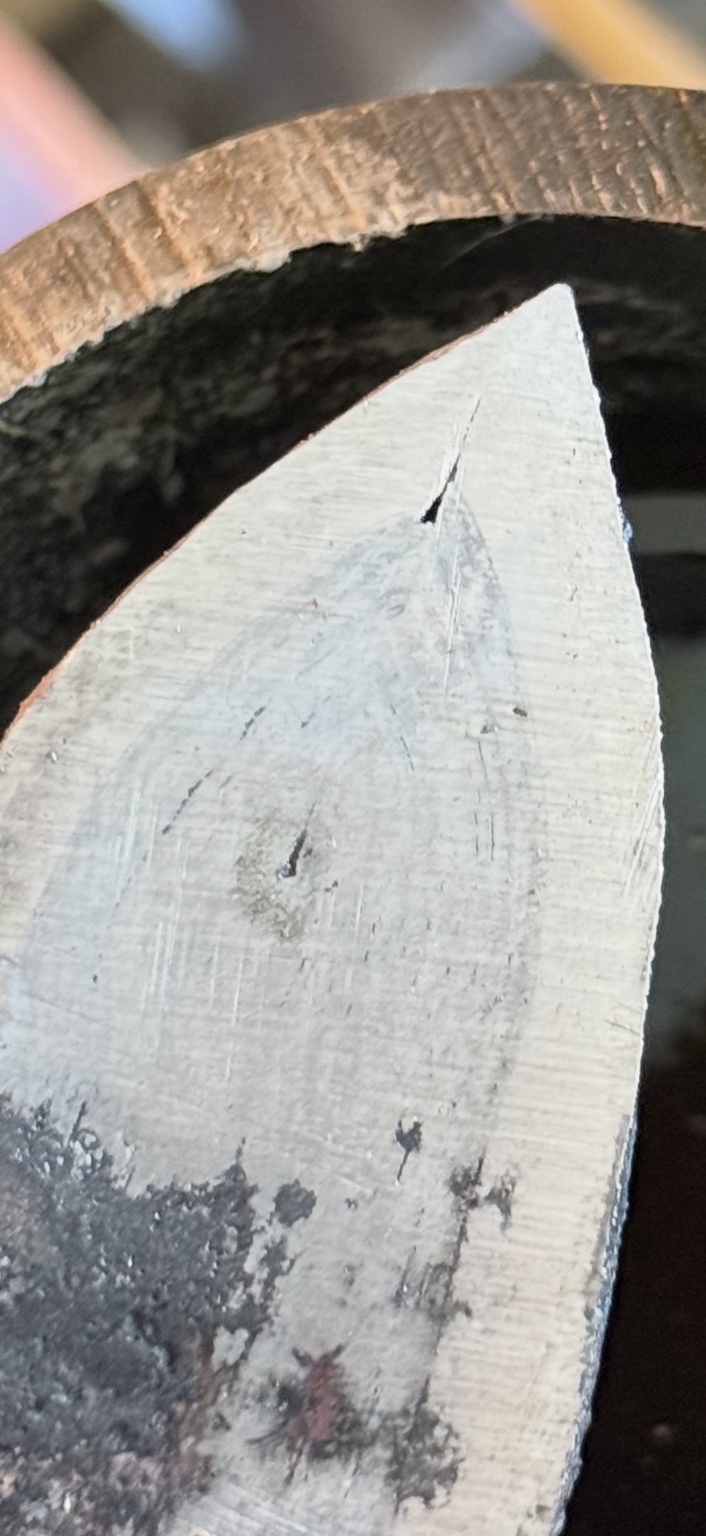
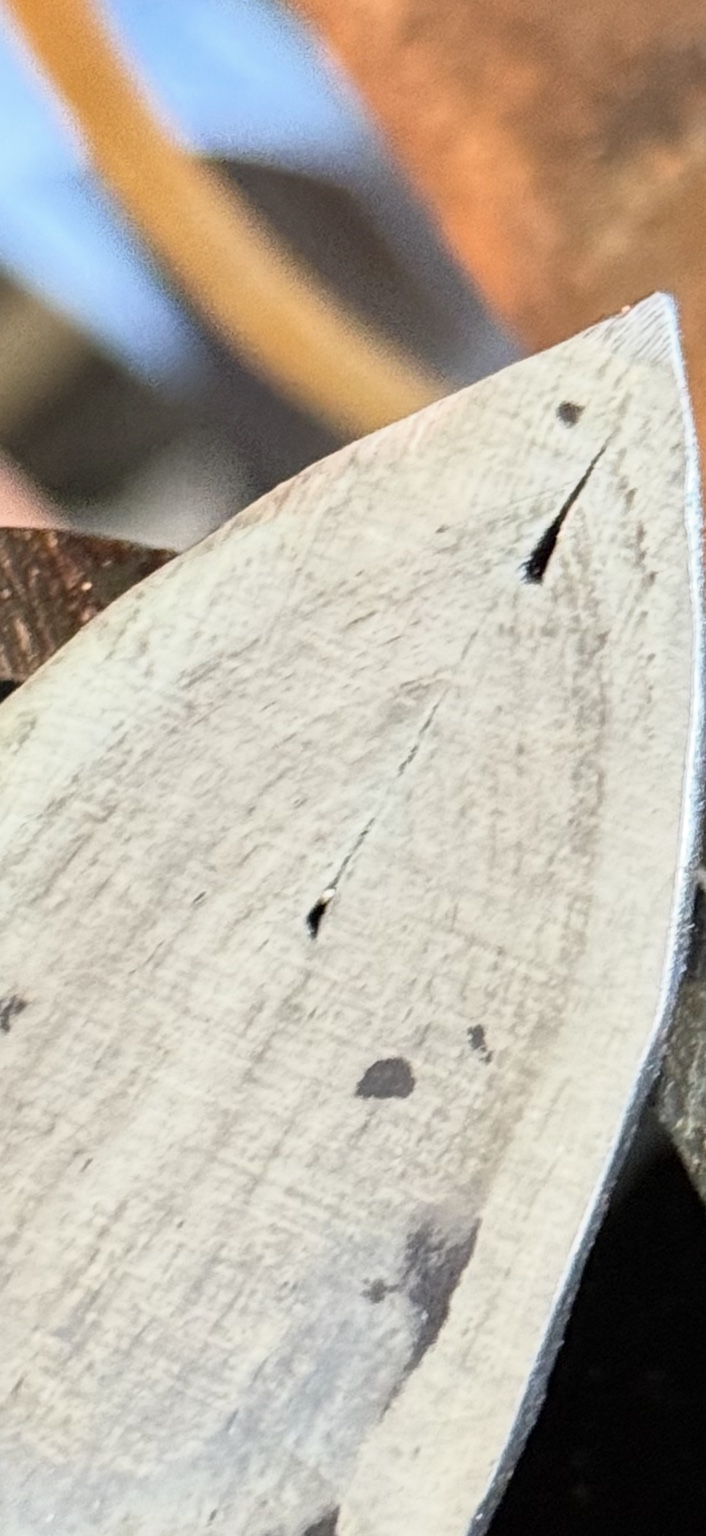
I heated the point and started tapping from the base of the fish-mouth toward the tip. Instead of staying in place so the surfaces could weld, the thin steel kept folding over. I tried lighter blows, but it didn't make much difference. The anvil pulled heat out of the thin point so quickly that I had very little time to work before the temperature dropped.
After the first failure, I cut off the damaged end and tried again. Then I did it again. I made roughly three or four attempts, and I didn't really change my method between them. Cutting back the point gave me slightly thicker material, but it also meant I had less sword left each time. Eventually I had to admit that I couldn't keep cutting it back and still finish the sword I had planned.
4. Knowing When to Stop
I was frustrated and disappointed. The hardest part wasn't losing the steel. I was making this for a friend and his squire, and I felt like I'd let them both down. I knew a fish-mouth weld could be done because I'd completed one before. I also knew I had it in me to learn this construction, but on this particular blade I'd made a mistake that I couldn't fix without losing more length.
Looking back, I would change two things. First, I would start with a lot more material. I began with what I think was about 1.5 pounds; next time I'd want at least 3 pounds (1.36 kg), maybe more, depending on the size of the sword. Second, I would weld the tip much earlier, before I drew the blade down so thin.
I've learned that for my current skills and equipment, having roughly 7–10 mm of material at the point gives me a much better chance of making that weld. That isn't a rule for everyone; it's what I need right now. Because this billet didn't have twisted pattern-welded rods in the middle, I could have closed the tip earlier without worrying about keeping a pattern lined up there. A sword with twisted rods would need more thought about when and how to close the point.
5. Why I Kept the Material
At first I thought about throwing the billet into the scrap pile. I'd already put a lot of work into welding and drawing it out, and I wasn't happy with where it had ended up. But then I started looking at it from a different angle. The sword had failed, but most of the billet was still good iron and steel.
Today I can order more steel if I run short. A smith working in the Viking Age didn't have that option. Iron had to be made from ore, and that took fuel, time, and hard work. Then the bloom had to be worked down into usable iron before a smith could even start on the blade. The value of that labor made me think differently about the material I had left.
I started wondering what a smith in that period might do with a failed sword billet. I can't prove that someone in the Viking Age would have turned a sword into a knife the way I did, and I don't want to claim that. But saving useful iron rather than wasting it makes practical sense to me, especially when you think about how much work went into making it.
There wasn't enough left for the sword, but there was enough for a long knife. I'd already wanted to make a Scandinavian long knife for my Norse, Rus, and Varangian reenactment kit, so that was an easy choice. The original project was over, but I could still make something good from the material.
6. The Scandinavian Long Knife
For the new blade, I looked at Viking Age long knives from Scandinavia and the eastern routes. Tomáš Vlasatý's work on Scandinavian long knives and wire-wrapped knife handles was especially useful. Those articles bring together finds from different places and show that long knives varied in size, blade shape, and handle construction. There wasn't one single way they were all made.
I wanted a long, fairly narrow blade with a wooden handle, brass wire wrapping, and a ring at the end. I wasn't copying one archaeological find. I was using features from several examples and working with the three-bar billet I already had.
6.1. Reforging the Billet
The blade still had a wrought-iron center between two bars of 1084 steel. That left high-carbon steel along both the edge and the spine of what was now a single-edged knife. Some historical knives used an iron back with a welded-on steel edge, but that wasn't how this billet had started. I chose to keep the material I had rather than rebuild it just to match a more common knife construction.
The biggest challenge was drawing the remaining billet down to the size I needed without tearing the wrought iron or pulling apart the welds. I kept the heat high and worked slowly. Wrought iron will let you know when you're asking too much of it, and I didn't want to lose another project by rushing. Taking smaller steps and watching the welds was what got me through the forging.
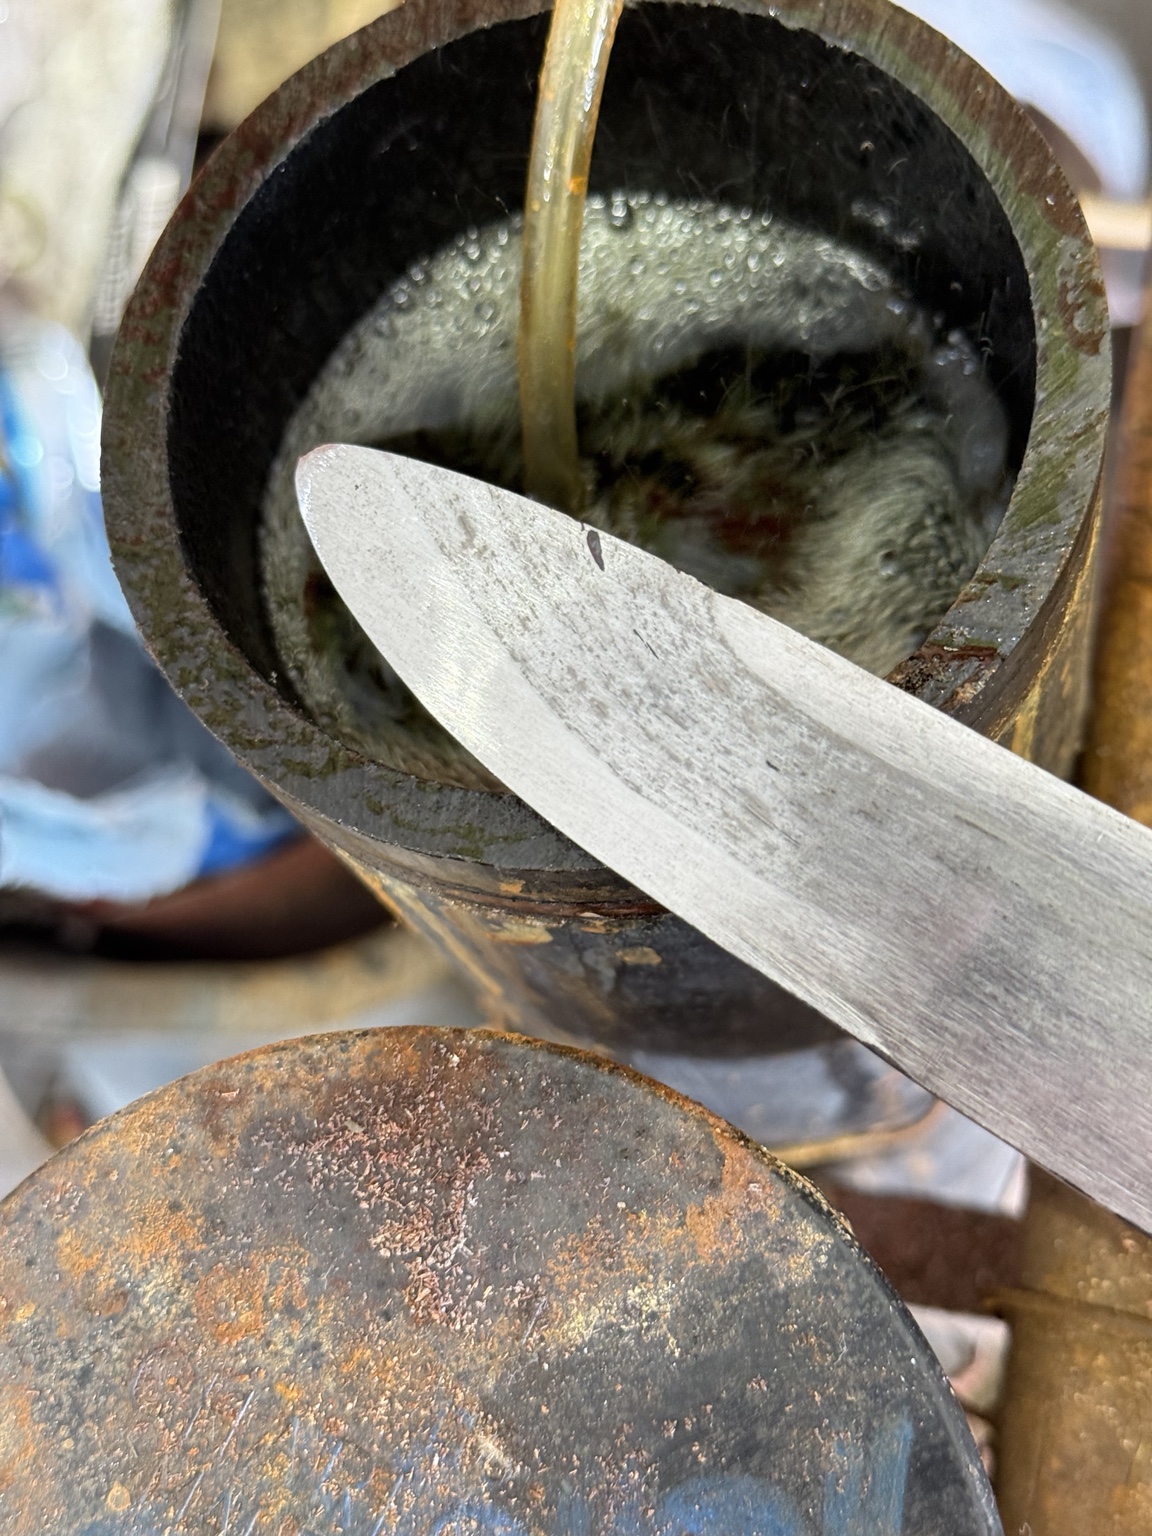
The finished blade was 325 mm long, 27 mm wide at the shoulder, and about 5 mm thick at the spine. The spine ended up thinner than the examples I'd been looking at, partly because of the material I lost while trying to save the sword and then reshaping the billet.
6.2. Handle Construction and Wire Wrapping
I made the handle from oak and added seven bands of brass wire set into grooves in the wood, along with a brass end plate and an iron suspension ring. I took inspiration from the finds discussed by Vlasatý, including Timerevo grave 348 and Birka grave 1130. I used 1.0 mm brass wire. Many of the archaeological examples described in that research used thinner wire, often around 0.5–0.6 mm, though thicker wire is known too. My finished handle measured 155 mm long.
I was really happy with how clean the wire wrapping looked and how the knife felt in my hand. If I were doing it again, I'd make the handle a little more oval and a little shorter. It's longer than I originally wanted, and that's something I'm working around as I make the sheath. Even with those things I'd change, the handle turned out better than I expected.
After I finished the knife, I talked with Götz Breitenbücher of Götz Ironworks about the wire wrapping. He explained a way of making the wraps with one continuous piece of wire instead of separate bands like mine. Between each wrapped section, the wire twists into a short braid that connects it to the next. Similar connected wraps appear in early medieval knife finds (Vlasatý 2021). It's a small detail, but it's one I'd like to try on the next handle.
6.3. Finished Dimensions
| Measurement | Finished knife |
|---|---|
| Blade length | 325 mm |
| Overall length | 480 mm |
| Blade width at shoulder | 27 mm |
| Spine thickness | 5 mm |
| Handle length | 155 mm |
| Wire decoration | Seven recessed brass bands |
This knife is a modern build inspired by historical finds, not an exact copy of one surviving knife. The complete Works entry has more on the measurements, heat treatment, photographs, and how the finished piece compares with archaeological examples.
7. What I Learned
Even though I didn't finish the sword, I learned a lot from making this knife. The biggest lesson was that I need to start with more material when I'm planning a complicated weld or a long blade. I still don't want to waste steel for no reason, but leaving myself no room for mistakes turned out to be far more wasteful.
I'm also more patient with forge welding now. I make sure the material is clean and free of oil, let it heat through before I start, and pay more attention to keeping the weld hot while I work. When I'm drawing out a billet with wrought iron, I work all four sides and overlap my heats instead of trying to move too much at once. I still make mistakes, but those habits have helped.
Most of all, this project reminded me to pay attention to the steel instead of just thinking about the blade I want at the end. If the material isn't moving the way it should, hitting it harder or working faster usually isn't the answer. Sometimes I need more heat, sometimes a different approach, and sometimes I need to stop before I make the problem worse.
Conclusion
I set out to make a Viking Age sword for a friend's squire, and I didn't get it done. I started with too little material, couldn't get the fish-mouth weld to take, and lost too much of the blade trying to fix it. That was disappointing, especially because of who the sword was for. But I still had enough good material to make a long knife and learn something along the way.
The knife isn't perfect. There are things about the handle, thickness, and finish that I would change, and I've tried to be clear about where my choices differ from the surviving historical examples. What I'm proud of is that I didn't waste the billet. I found another use for it and ended up with something I think is beautiful.
I know I'll have more failed welds as I try harder projects. That's part of learning this craft. I can only try to understand why something went wrong and use that the next time I stand at the anvil. There's an old saying among bladesmiths: "Bladesmiths never fail, they only make shorter knives." That's pretty much what happened here, and I still plan to take another run at that sword.
References and Further Reading
Androshchuk, Fedir (2014). Viking Swords: Swords and Social Aspects of Weaponry in Viking Age Societies. The Swedish History Museum, Studies 23, Stockholm. Publisher information.
Hedenstierna-Jonson, Charlotte et al. (2017). "A female Viking warrior confirmed by genomics." American Journal of Physical Anthropology 164(4), 853–860. DOI: 10.1002/ajpa.23308.
Petersen, Jan (1919). De norske vikingesverd: en typologisk-kronologisk studie over vikingetidens vaaben. Kristiania: Jacob Dybwad.
Price, Neil et al. (2019). "Viking warrior women? Reassessing Birka chamber grave Bj.581." Antiquity 93(367), 181–198. DOI: 10.15184/aqy.2018.258.
Viskupič, Michal (2025). "Petersen Type V Sword." Projekt Forlǫg. Read article.
Vlasatý, Tomáš (2020). "Evolution of Scandinavian Long Knives." Projekt Forlǫg. Read article.
Vlasatý, Tomáš (2021). "Wire Wrapped Knife Handles of 9th–12th Century." Projekt Forlǫg. Read article.
Vlasatý, Tomáš (2022). "Supplement to Androshchuk's Sword Catalog of Viking Age Sweden." Projekt Forlǫg. Read article.
Wåhlander, Linda (ed.) (2023). Buried at Birka: Three Centuries, Four Viking Lives. See especially "The Type E Sword," by Linda Wåhlander and Peter Johnsson, pp. 118–121. Read pp. 118–121 in the online edition.
Statens historiska museer. Collection records for the Bj 581 sword, 263195_HST, and Petersen Type E sword, 263051_HST.
Related project: Viking Age Scandinavian Long Knife — Atilivs Ironworks
If you enjoyed this article and would like to support more research, documentation, and work at the anvil, you can buy me a coffee.
Buy Me a CoffeeWorkshop notes: The work at the forge and the experiences described here are my own. Historical information is drawn from the sources listed above.
Editorial note: AI was used for editorial assistance, including organization and grammar. The project and workshop experiences are my own.